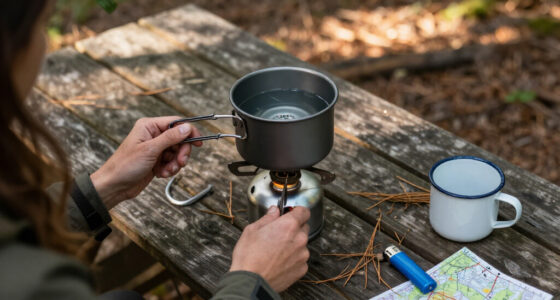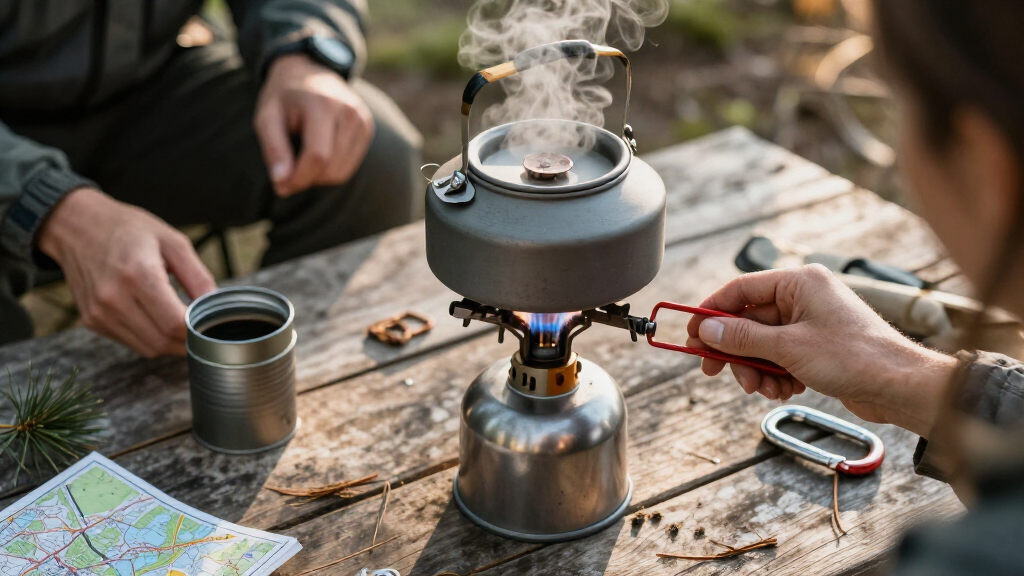
This guide shows you how to set up, light, cook on, and pack away a compact canister-style camping stove — the kind used for backpacking, car camping, and day trips. By the end, you will be able to boil water and cook a simple meal outdoors safely, without wasting fuel or fumbling with the flame.

Get travel and outdoor gear delivered free with Prime
- Fast, free delivery on millions of items
- Prime Video, Amazon Music and more included
- Member-only deals all year

Gas One GS-3400P Dual Fuel Portable Camping Stove
- ✔ Fuel Types: Butane 8 oz cartridge or propane 16.4 oz cylinder (both sold separately)
- ✔ Ignition: Automatic piezo electric
- ✔ Heat Control: Adjustable heat dial

AOTU Portable Camping Stove with Piezo Ignition
- ✔ Weight: 110g
- ✔ Packed Size: 4 x 5 x 8 cm
- ✔ Max Output: 3000W
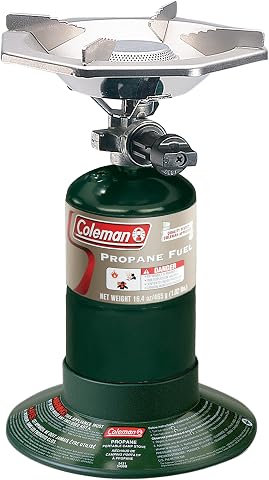
Coleman Bottletop Propane Camping Stove, 10,000 BTU Single Burner
- ✔ BTU Output: Up to 10,000
- ✔ Burners: 1 adjustable
- ✔ Pan Compatibility: Up to 8 inch pan
The guide is written for beginners who have just bought (or borrowed) a compact stove and have never used one, or who tried once and felt unsure about it. No prior outdoor cooking experience is needed. Budget 20-30 minutes for your first full cook, and plan to run one practice session at home before your first trip — the parking lot or campsite is the wrong place to learn how your stove behaves.
The instructions cover the most common type: a canister stove with a screw-on burner and a threaded gas canister containing an isobutane-propane mix. Liquid-fuel and remote-canister stoves differ slightly, and those differences are noted where they matter.
Difficulty: Beginner | Time: 20-30 minutes (setup and first cook), plus 15 minutes practice before your trip
What You’ll Need
Tools & Materials:
- A compact canister stove (burner with screw thread)
- A compatible threaded gas canister (isobutane/propane mix) with at least 25% fuel remaining
- A pot or pan designed for camp stoves (1-1.5 liters is typical) with a lid
- A lighter or matches (carry two ignition sources)
- A stable, level surface: a table, flat rock, or bare compacted ground
- Water and food to cook
- Pot gripper or handle (if your pot has no built-in handle)
- A small stuff sack or case for the stove
Knowledge:
- How to strike a match or operate a lighter
- Basic stove safety: never use a canister stove inside a tent or enclosed space
Check your stove and canister threads match before leaving home. Most stoves use the standard EN 417 threaded valve (7/16″), which nearly all isobutane canisters in outdoor shops use — but a few budget stoves and older canisters use bayonet fittings. Read the stove manual if you have it, and confirm the canister lists compatibility with screw-on stoves.
Practice at home first, on a concrete patio or driveway, well away from anything flammable. Do this before your trip so problems surface where you can fix them easily.
Gas One GS-3400P Dual Fuel Portable Camping Stove
The Gas One GS-3400P earns our top spot for one reason neither competitor can match: it runs on both butane cartridges and propane cylinders, with the propane converter regulator included. That flexibility translates directly into buyer outcomes — you can use cheap, widely available 8 oz butane cartridges for summer car camping, then switch to a 16.4 oz propane cylinder when temperatures drop or butane stock runs dry. For emergency preparedness, that fuel redundancy is arguably the single most valuable feature any compact stove can have.Compared with the Coleman Bottletop, the GS-3400P offers a similar cartridge-style cooking experience but with genuine cold-weather capability and a piezo ignition that the Coleman lacks — no matches or lighters to fumble with in wind. Its safety engineering is also more sophisticated than either competitor: a built-in pressure sensor ejects the butane cartridge and cuts gas flow if irregular pressure is detected, a meaningful safeguard for a stove that lives in a closet most of the year.The tradeoffs are real, though. It isn’t ultralight — the AOTU beats it decisively on weight and packed size — and its burner output is more modest than the Coleman’s, so boil times for large volumes of water will be slower. The included carrying case partially offsets the bulk issue, and its adjustable heat dial handles delicate simmering better than most budget single-burners. This pick makes the most sense for campers who want one stove that covers campsite, tailgate, and power-outage scenarios without buying specialized gear for each.
Pros:
- Dual-fuel design runs on both 8 oz butane cartridges and 16.4 oz propane cylinders
- Automatic piezo ignition eliminates the need for matches or lighters
- Pressure-sensor cartridge ejection and gas flow cutoff add genuine safety
- Included carrying case and propane converter regulator add out-of-box value
Cons:
- Neither fuel type is included, so first-use requires a separate purchase
- Heavier and bulkier than canister-top backpacking stoves like the AOTU
- Butane performance drops noticeably in cold weather
Best for: Car campers, emergency preppers, and anyone who wants one stove that handles both butane and propane fuel sources
Not ideal for: Backpackers counting grams, or cooks who regularly boil large pots quickly
Bottom line: The most versatile compact stove in this lineup — its dual-fuel flexibility makes it the safest single purchase for mixed camping and emergency use.
“The most versatile compact stove in this lineup — its dual-fuel flexibility makes it the safest single purchase for mixed camping and emergency use.”
AOTU Portable Camping Stove with Piezo Ignition
If the GS-3400P is the versatile workhorse, the AOTU Portable Stove is the specialist. At 110 grams and a packed size of just 4 x 5 x 8 cm, it is dramatically lighter and smaller than both the Gas One and the Coleman — this is a stove that genuinely fits in a jacket pocket and disappears into a backpack. For thru-hikers, bikepackers, and minimalist overnight campers, that difference isn’t a nice-to-have; it’s the entire buying decision.The design is smarter than its size suggests. A honeycomb windproof net improves combustion in breezy conditions — a real advantage over open-flame designs — while the adjustable valve runs from a gentle simmer up to a 3000W maximum output, enough to boil water for freeze-dried meals quickly. The included piezo ignition and plastic storage case mean there are no extras to buy or carry. Compared with the Coleman, it gives up raw BTU power and pan capacity, but it wins on every portability metric that matters in the backcountry.The limitations are structural, not incidental. It is not compatible with propane canisters, so it depends on threaded EN 417 butane/propane mix canisters — fine at outdoor retailers, trickier in remote areas or emergencies. And its 9.5 cm fire plate is the smallest platform here, so pots wider than 20 cm become unstable, effectively capping it at cooking for one to three people with small cookware. This model is better suited to soloists and pairs who value weight above all; skip it if you’re cooking family meals from the trunk of a car.
Pros:
- Featherweight at 110g with a pocket-sized 4 x 5 x 8 cm packed footprint
- Adjustable flame from true simmer to full 3000W output
- Honeycomb windproof net improves combustion in breezy conditions
- Includes piezo ignition and a compact storage case
Cons:
- Not compatible with propane canisters, limiting fuel options
- Small fire plate makes larger pots unstable
- Butane canister performance suffers in freezing temperatures
Best for: Backpackers, thru-hikers, and minimalists cooking for 1-3 people with small pots
Not ideal for: Group campers, cold-weather trips, or anyone needing propane compatibility
Bottom line: The clear pick when weight is the deciding factor — it out-portables every rival here, provided your cookware and fuel plans stay small.
“The clear pick when weight is the deciding factor — it out-portables every rival here, provided your cookware and fuel plans stay small.”
Coleman Bottletop Propane Camping Stove, 10,000 BTU Single Burner
The Coleman Bottletop Propane Stove plays a different game entirely: it’s the most powerful burner in this comparison, delivering up to 10,000 BTUs against the AOTU’s modest 3000W. That translates to faster boil times and better performance when you’re actually cooking rather than just rehydrating meals — searing, frying, and heating larger volumes of water happen noticeably quicker.What separates this model from cheaper bottletop burners is engineering. A built-in pressure regulator keeps output consistent in extreme conditions, which matters because unregulated propane stoves fade badly as cylinders empty or temperatures fall — a genuine edge over the butane-dependent AOTU in cold weather. Wind baffles protect the flame and preserve fuel efficiency, and Coleman backs it with a 3-year limited warranty, the longest brand support in this lineup. Its space-saving detachable burner design screws directly onto a standard 16.4 oz propane cylinder, the most universally available fuel in North American campgrounds.The tradeoffs: there’s no piezo ignition, so you’ll need a match or lighter every single time — a daily annoyance the Gas One and AOTU eliminate. And the 8-inch pan limit is the strictest cookware restriction here, narrower even than the AOTU’s 20 cm ceiling. Compared with the GS-3400P, you gain raw power, cold-weather reliability, and fuel availability, but lose dual-fuel flexibility, push-button ignition, and safety sensors. This pick makes the most sense for campers who cook real meals at drive-in sites and want a burner they’ll still own in a decade.
Pros:
- Highest output in this comparison at up to 10,000 BTUs
- Pressure regulator maintains consistent performance in extreme conditions
- Wind baffles and PerfectHeat design protect the flame and conserve fuel
- 3-year limited warranty from an established brand
Cons:
- No piezo ignition — matches or a lighter required every use
- Pan support limited to 8 inches, the tightest here
- Propane cylinder sold separately
Best for: Car campers and cabin visitors who want maximum heat, propane availability, and long-term durability
Not ideal for: Backpackers, or anyone who wants push-button ignition and large cookware support
Bottom line: The most powerful and cold-weather-reliable option here, best for campsite cooks who value consistent propane heat over ultralight portability.
“The most powerful and cold-weather-reliable option here, best for campsite cooks who value consistent propane heat over ultralight portability.”
As an Amazon Associate we earn from qualifying purchases.
Before You Start
Safety before anything else: never operate a compact camping stove inside a tent, vehicle, or any enclosed space. These stoves produce carbon monoxide and can ignite tent fabric. Cook outside, in open air, at least several feet from your tent and any dry vegetation.
Inspect your equipment before each use. Look for dents or cracks on the canister, check that the stove’s valve turns smoothly, and confirm the rubber O-ring on the stove’s connector is present and undamaged. A damaged or missing O-ring will leak gas when you connect the canister. If you find damage, do not use the equipment.
Cold weather note: canister stoves lose pressure below roughly 4°C (40°F) because the fuel stops vaporizing well. If you are cooking in cold conditions, keep the canister warm (inside your jacket, not next to skin) until moments before use, and consider putting a small pad underneath it so cold ground does not chill it further.
Step-by-Step Instructions
Step 1: Choose and prepare a stable cooking spot
Find a flat, level patch of bare ground, rock, or a picnic table, outdoors and away from overhanging branches, dry grass, and your tent. Clear the immediate area of leaves and debris in roughly a one-meter circle. Place your pot, lighter, and food within arm’s reach so you never leave a burning stove unattended.
Tip: If the ground is soft or uneven, use a flat rock or a small piece of plywood as a base. A stove that tips with a pot of hot water on it is the single most common cause of burns and ruined dinners.
Check: The stove sits level and does not rock when you press lightly on its edge from several directions.
Step 2: Attach the stove to the fuel canister
Close the stove’s control valve fully by turning it clockwise until it stops. Stand the canister upright on your stable surface, place the stove on top, and screw the stove down onto the canister threads hand-tight. Grip and turn the stove itself, not the canister, to avoid stressing the valve.
Tip: Stop when it is snug. Over-tightening can damage the O-ring and threads. If you hear hissing or smell gas during or after attachment, immediately back the stove off, move away from any flame, and inspect the O-ring.
Check: The stove sits firmly on the canister with no gap at the joint and no hissing sound. A brief one-second hiss on the very first connection of a new stove is normal (trapped air releasing); continuous hissing is not.
Step 3: Check for leaks and test the valve
Stand the stove upright. Open the control valve a quarter-turn counterclockwise, listen for a brief, quiet flow of gas, then close the valve again immediately. If you hear sustained hissing with the valve closed, or smell gas strongly, disconnect the stove outdoors and check the O-ring and threads.
Tip: For a definitive leak check at home, apply soapy water around the joint with the valve open for two seconds — bubbles mean a leak. Wipe the joint dry before lighting.
Check: Gas flows when the valve opens and stops completely when it closes, with no lingering odor.
Step 4: Light the stove
Ignite your lighter or match and hold it beside the burner, about half a centimeter from the burner head, before opening the valve. Slowly open the valve a quarter to half turn and let the stove catch. Adjust the valve until you see a steady flame with a soft blue color, possibly with a small orange tip.
Tip: Always ignite your match or lighter first, then open the valve. Opening the valve first lets gas pool around the burner and can produce a flare when you light it. Many stoves have piezo igniters — these fail often, so always carry matches or a lighter as backup.
Check: You see a steady, mostly blue flame that responds immediately when you adjust the valve, with no yellow roaring flame or lifting off the burner.
Step 5: Place your pot and bring water to a boil
Center your pot carefully on the burner’s pot supports, making sure the handles (if any) point away from the flame. Adjust the flame to medium-high — the blue cone should reach roughly to the bottom of the pot without crawling up the sides. Put the lid on and wait. Expect one liter of water to boil in 3-5 minutes in calm conditions.
Tip: Do not use a pot wider than your stove’s supports recommend (usually about 20 cm maximum) — wide pots on narrow stoves tip easily. A full pot is more stable than a nearly empty one, so fill what you need, not a dribble.
Check: The flame stays under the pot, steam appears within a few minutes, and the pot reaches a rolling boil with bubbles across the whole surface.
Step 6: Cook your meal and control the heat
Reduce the flame to the level your food needs — simmering means small blue flames, not the full roar you used to boil. Stir or rotate the food regularly because compact stoves concentrate heat in a small hot spot. Turn handles outward and use a pot gripper when touching anything metal; handles get hot within a minute.
Tip: Compact stoves have narrow burner heads, so the center of your pan runs much hotter than the edges. For anything fried or browned, keep the food moving or use a heat-diffusing plate if your stove kit includes one.
Check: Your food cooks evenly without scorching in the center, and the flame size changes promptly when you turn the valve.
Step 7: Shut down and cool the stove
Turn the control valve fully clockwise until the flame goes out and the valve stops turning. Leave the burner, pot supports, and pot untouched — they stay hot enough to burn skin for several minutes. Wait at least five minutes before handling anything.
Check: The flame is completely out, with no residual gas smell, and the metal is cool enough to touch after waiting.
Step 8: Disconnect and pack away
Unscrew the stove from the canister by hand once everything is cool. Expect some faint hissing for a second as the internal seal releases — this is normal. Stow the stove in its case or stuff sack, cap the canister’s valve with its plastic cover if it came with one, and pack both upright in your kit where they will not be crushed.
Tip: Never pack a canister inside a pot while it is still warm, and never leave a canister loose in a pack where gear can knock against the valve. Transport canisters in a padded pocket or with the stove detached.
Check: The stove is dry, cool, and bagged; the canister is sealed and stowed upright; nothing smells of gas.
Common Mistakes to Avoid
- Opening the gas valve before holding a flame to the burner, causing a flare-up when lit. — Always light your match or lighter first, position it at the burner, then slowly open the valve. The stove should catch within a second.
- Placing the stove on soft, uneven ground or a picnic table edge, so the pot tips during cooking. — Set up on a level, hard surface and test stability by pressing on the stove’s edge before lighting. Keep the pot centered on the supports at all times.
- Running the stove on a full-power flame for everything, scorching food and burning through fuel. — Use full power only to boil water; turn the valve down to small blue flames for simmering. Learn where your stove’s simmer point is during your home practice session.
- Cooking inside a tent or vestibule to escape wind or rain. — Never do this — carbon monoxide buildup and tent fires are real hazards. Use a windscreen positioned a few inches away on the windward side only (never wrapping tightly around the canister, which overheats it) or move to a sheltered open spot.
Troubleshooting
Problem: The stove will not light or the flame is weak and yellow.
Solution: First check that the canister has fuel (shake it — a nearly empty canister feels light and sloshes little). If fuel remains, the canister may be cold; warm it under your jacket for five minutes. If the igniter sparks but nothing lights, use a match directly at the burner. A yellow, sooty flame usually means a partially blocked jet: let the stove cool, then clean the burner holes gently with a toothbrush or the cleaning needle many stoves include.
Problem: Gas hisses when you attach the stove, or you smell gas with the valve closed.
Solution: Disconnect the stove outdoors, away from any flame. Inspect the rubber O-ring on the stove’s connector for cracks, flattening, or absence. A damaged O-ring is the most common leak cause; replacement rings are cheap and sold at outdoor retailers. Do not use the stove until the leak is fixed.
Problem: The flame sputters or dies after a few minutes of cooking.
Solution: This typically means the canister is chilling from sustained use or is nearly empty. Lift the pot and feel the canister — if it is very cold to the touch or frost is forming, pause cooking and warm it. If the canister feels light and the flame weakens progressively, swap in a full canister. Cold weather makes both problems worse, so carry a spare canister in winter.
Problem: The piezo igniter clicks but produces no spark.
Solution: Piezo igniters fail frequently, especially after rain or rough packing. Check that the igniter tip sits close to the burner (a few millimeters) and is dry. If it still fails, light the stove with a match or lighter — this is why carrying a backup ignition source is standard practice. Igniter buttons can sometimes be replaced by the manufacturer.
What Success Looks Like
You have completed this task correctly when you can do the following in one session, without hesitation: attach the stove to the canister with no leaking, light it with a steady blue flame on the first or second attempt, boil a liter of water in under five minutes in calm conditions, simmer food without scorching it, shut the stove down cleanly, and pack it away cool and dry. If you ran one full practice cook at home — boil water, then make a simple meal like pasta or couscous — you are ready to rely on the stove in the field.
Next Steps
After your practice session, plan your fuel needs for your first trip: a 230 g canister typically boils 12-15 liters of water, which covers a weekend of freeze-dried meals and hot drinks for one or two people. Weigh a full canister and write the weight on it with a marker, then reweigh after your trip to track consumption.
Build your routine skills over the next few outings: try cooking rice or pancakes (harder than boiling water), and practice lighting the stove in light wind using a windscreen. Clean the burner after every few uses with a dry toothbrush, and check the O-ring each time you connect. Store canisters in a cool place indoors, never in a hot car, and dispose of fully empty canisters at a recycling point that accepts them. If you camp in cold weather regularly, research inverted-liquid-feed stove systems or four-season canister mixes as a later upgrade.
Frequently Asked Questions
How do I tell how much fuel is left in my canister?
Weigh the canister on a kitchen scale and subtract the tare weight printed on the label — the remainder is fuel in grams. A rough field method: float the canister in a bowl of water; the deeper it floats, the emptier it is. Marking the full weight on the canister with a marker makes tracking easy over multiple trips.
Can I use a compact stove in the wind?
Yes, with care. Position a windscreen a few inches from the stove on the windward side, or use your body or a rock as a shield. Never wrap a windscreen fully around a canister stove — trapped heat can overheat the canister, which is dangerous. Some stoves have integrated wind protection around the burner; these handle wind much better than open burners.
Can I fly with my camping stove and canister?
Fuel canisters are prohibited in both carry-on and checked luggage on all commercial flights — even empty ones, since they contain residual gas. The empty stove itself is usually allowed in checked baggage, but check your airline’s rules and clean it so it carries no fuel odor.
How long does a gas canister last?
Stored indoors at room temperature, sealed canisters last for years — the fuel does not degrade. Once connected, a canister can be disconnected and reconnected many times without meaningful loss, as the valve reseals. A 230 g canister typically boils 12-15 liters of water, enough for roughly 2-3 days of solo cooking.
My stove flame is yellow and leaves soot on my pot. Is that a problem?
A yellow flame means incomplete combustion, usually from a blocked burner jet or very cold fuel. It wastes fuel and coats cookware in soot. Clean the burner holes with the supplied needle or a fine wire once the stove is fully cool, and keep the canister warm in cold conditions. A healthy flame should be blue with, at most, small orange tips.
Halloween Picks
halloween
As an affiliate, we earn on qualifying purchases.