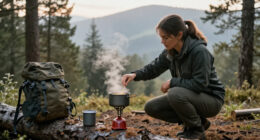
Choose and pack a portable outdoor cookware kit that fits your group, meals, stove, and trip length. This guide is for beginner campers who want to cook outdoors without carrying unnecessary gear. Allow 30–45 minutes to review your setup and pack it; cooking time depends on your menu.

Get travel and outdoor gear delivered free with Prime
- Fast, free delivery on millions of items
- Prime Video, Amazon Music and more included
- Member-only deals all year
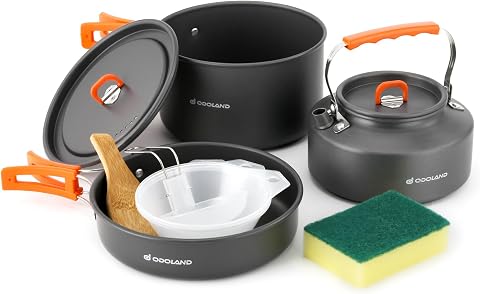
Odoland 10pcs Camping Cookware Set with Pot, Fry Pan, Kettle, Plastic Bowls and Soup Spoon
- ✔ Brand: Odoland
- ✔ Piece count: Listed as 11 pieces in specs; title describes 10pcs
- ✔ Material: Anodized aluminum cookware, plastic bowls, bamboo spatula

MalloMe Camping Cookware Mess Kit for Backpacking Gear
- ✔ Brand: MalloMe
- ✔ Piece count: 17
- ✔ Material: Hard-anodized aluminum; stainless steel cups and plates

Odoland 19pcs Camping Cookware Mess Kit, Non-Stick Pot Pan Kettle Set for 2
- ✔ Brand: Odoland
- ✔ Piece count: 19
- ✔ Body material: Hard-anodized aluminum with nonstick surface
Difficulty: Beginner | Time: 30–45 minutes to choose and pack; cooking time varies
What You’ll Need
Tools & Materials:
- Camping stove or planned campfire cooking setup
- Compatible fuel, if using a stove
- Pot or pan suitable for the heat source
- Cooking spoon or spatula
- Lid, if needed for your meals
- Water and biodegradable camp soap, where permitted
- Sponge or cloth
- Food storage container or resealable bags
- Heat-resistant gloves or pot gripper
- Pack or storage box
Knowledge:
- Basic stove operation and fuel handling
- Awareness of local fire restrictions and food storage rules
Check the stove maker’s instructions for cookware size and material compatibility. Confirm fire rules, water access, and food storage requirements at your campsite. Never use a stove or charcoal burner inside a tent, vehicle, or enclosed shelter.
Odoland 10pcs Camping Cookware Set with Pot, Fry Pan, Kettle, Plastic Bowls and Soup Spoon
For campers who want cooking essentials without a heavier tableware bundle, the Odoland 10-piece set makes the clearest all-around case. Its stated 1.7-pound weight is the lowest among these listings, and the 2 L pot is also the largest stated pot capacity here. That combination favors hikers who want room to cook a simple shared meal while keeping the cookware load modest. The set adds a 0.7 L fry pan and 1.1 L kettle, so it can handle more than just boiling water.Compared with the MalloMe kit, this set has fewer listed pieces and plastic bowls rather than stainless steel cups and plates. That is a meaningful trade: the lighter setup may be easier to justify in a backpack, but the bowls are less sturdy and the product details do not specify a full place setting for two. Its foldable, thermally insulated handles and mesh bag support compact transport, while anodized aluminum and nonstick surfaces are intended to simplify cooking and cleanup. As with other nonstick cookware, careful utensil use is sensible.This pick suits campers who prioritize low carrying weight and useful pot volume over a more complete dining set. Choose the 19-piece Odoland instead if matching cups, plates, and cutlery for two matter more than minimizing weight; choose MalloMe if stainless tableware is a priority. The Odoland 10-piece set is less compelling for groups needing larger meal portions or anyone who wants durable metal bowls included.
Pros:
- Lowest stated weight in this comparison at 1.7 pounds.
- Largest listed pot capacity at 2 L.
- Includes a pot, pan, kettle, bowls, spoon, spatula, sponge, and mesh bag.
- Foldable insulated handles help reduce packed bulk and make handling more comfortable.
Cons:
- The plastic bowls are less sturdy than metal alternatives.
- The 0.7 L pan and 2 L pot may limit portions for larger groups.
Best for: Backpackers and campers who want a low stated weight, a 2 L pot, and basic cooking pieces in one packable set.
Not ideal for: Campers who need a sturdy metal place setting for two or regularly cook large portions.
Bottom line: We recommend it as the best overall balance here for campers who value a light kit and a comparatively roomy pot more than a metal dining set.
“We recommend it as the best overall balance here for campers who value a light kit and a comparatively roomy pot more than a metal dining set.”
MalloMe Camping Cookware Mess Kit for Backpacking Gear
The MalloMe is the strongest fit when a portable cooking set should also cover the basics of eating at camp. Alongside a 1.7 L pot, 1.15 L kettle, and 7-inch pan, its 17-piece kit includes stainless steel cups and plates, cutlery, cleaning accessories, and a drawstring bag. The stated hard-anodized aluminum construction and nestable design make it a more complete alternative to the lighter-feeling Odoland 10-piece set, whose bowls are plastic and whose listed pieces do not provide the same stainless tableware setup.That completeness comes with a carrying tradeoff. The listing warns that the full kit may feel heavy on extended ultralight hikes, and it does not provide a total weight for comparison. Its pot is also smaller than the 2 L pot in the 10-piece Odoland and the 1.9 L pot in the 19-piece Odoland. For a solo cook focused on simple meals, those extra cups, plates, and cutlery may be more equipment than the trip requires. For a camp kitchen shared among companions, they reduce the need to assemble a separate dining kit.We place MalloMe second because it prioritizes tableware completeness and shared convenience over the lowest stated carry weight or largest pot. It makes sense for campers who want a ready-to-pack kit and value stainless steel eating pieces. If you count every ounce, the 10-piece Odoland has a clearer weight advantage; if you want a set specifically described for one or two people with all pieces matched, consider the 19-piece Odoland instead.
Pros:
- Includes cookware, stainless steel cups and plates, cutlery, and cleaning accessories.
- Hard-anodized aluminum construction is described as durable and evenly heating.
- Nestable pieces and a drawstring bag support compact storage.
- Heat-resistant handles and lids are included for camp cooking.
Cons:
- The complete 17-piece kit may feel heavy on extended ultralight hikes.
- Its 1.7 L pot is smaller than either Odoland pot listed here.
Best for: Car campers and backpackers who value included stainless steel cups, plates, and cutlery as part of a single nestable kit.
Not ideal for: Extended ultralight hikers or cooks who need the largest pot capacity in this comparison.
Bottom line: We favor MalloMe when a ready-made dining setup matters more than minimizing kit weight or maximizing pot volume.
“We favor MalloMe when a ready-made dining setup matters more than minimizing kit weight or maximizing pot volume.”
Odoland 19pcs Camping Cookware Mess Kit, Non-Stick Pot Pan Kettle Set for 2
For a pair of campers who want matching cookware and tableware in one bundle, the Odoland 19-piece set is the most explicitly two-person option in this lineup. It supplies two stainless steel cups, two plates, and two sets of cutlery, along with a 2 qt pot, 5.7-inch pan, and 27 fl oz kettle. The pieces nest into a bag listed at 7.5 by 7.5 by 5 inches, giving buyers a concrete sense of the packed footprint. Its stated weight is 2.75 pounds, however, so compact storage should not be mistaken for a light load.Compared with the 10-piece Odoland, this version adds paired tableware and cutlery but weighs more and has a slightly smaller stated pot capacity at about 1.9 L. Its pan is also the smallest listed by diameter, making it less suited to cooking broad portions. MalloMe offers a larger 7-inch pan and a kettle with greater stated capacity, while the Odoland 19-piece set is more clearly configured as a matched kit for two. The hard-anodized aluminum body is described as heating quickly and evenly, and the nonstick surface may simplify cleanup.The main care constraint matters for outdoor use: the listing says the coating can be damaged by metal utensils or high heat. Campers should use gentler utensils and manage heat accordingly. We rank this third because it solves the paired dining problem well, yet the stated weight and small pan narrow its appeal for solo hikers or anyone prioritizing cooking space. Choose it when an organized two-person kit is worth carrying; choose the 10-piece Odoland for the lower listed weight.
Pros:
- Includes two cups, plates, and cutlery sets alongside cookware.
- Nests into a bag with stated dimensions of 7.5 x 7.5 x 5 inches.
- Hard-anodized aluminum is described as providing fast, even heating.
- Includes a cleaning cloth and carry bag.
Cons:
- At 2.75 pounds, it is heavier than the 1.7-pound Odoland 10-piece set.
- The 5.7-inch pan is the smallest listed by diameter.
- Nonstick coating requires care around metal utensils and high heat.
Best for: Two campers who want matching cups, plates, and cutlery packed with the core cookware.
Not ideal for: Solo ultralight hikers, larger groups, or cooks who need a wider frying surface.
Bottom line: We recommend it for two-person trips that benefit from a matched, nestable mess kit and can accommodate its stated weight.
“We recommend it for two-person trips that benefit from a matched, nestable mess kit and can accommodate its stated weight.”
As an Amazon Associate we earn from qualifying purchases.
Before You Start
Plan your cookware around the meals you will actually prepare. A solo overnight trip may need one small pot and a mug; a group meal may need a larger pot, serving utensil, and separate eating dishes. Check that cookware sits securely on the stove supports and does not extend beyond the recommended diameter. For campfire cooking, use only cookware rated for direct flame and follow site rules.
Inspect the stove, fuel connection, pot handles, and cookware before packing. Do not use cracked, badly warped, or unstable items. Keep fuel separate from food and cookware, and carry it according to its label and transport rules.
Step-by-Step Instructions
Step 1: Plan meals and portions
Write down each meal you expect to cook and note whether it requires boiling, simmering, frying, or only hot water. Estimate portions for everyone in the group, then choose the smallest number of pots and pans that can handle those meals in sequence. Include a mug or bowl only if you will use it.
Tip:Meals that use boiling water, such as oatmeal or dehydrated food, can often share one pot. Check whether your menu needs a frying surface before packing a skillet.
Check: Your list links each planned meal to a piece of cookware, and you have removed items with no planned use.
Step 2: Match cookware to your heat source
Check the stove manual or cookware label, then select pots and pans made for that heat source. For a backpacking stove, confirm the base fits the supports and the pot is stable. For a campfire, choose cookware explicitly rated for flame exposure and use a safe way to lift it.
Tip:Lightweight aluminum and titanium are common for portable stove kits, while heavier steel or cast iron may suit some car camping setups. Weight, heat distribution, durability, and fire compatibility differ by item.
Check: Each cooking piece is rated for your planned heat source and rests securely without rocking.
Step 3: Choose a practical kit size
Select the smallest pot capacity that can hold your largest planned batch without filling it to the rim. Add a pan only when your menu calls for frying or sautéing. For groups, check whether one large pot will serve everyone or whether cooking in batches is more practical.
Tip:A pot that is too small can boil over; a much larger one takes more fuel and pack space. Use the manufacturer’s volume markings when available.
Check: The largest meal fits with room for stirring, and the kit has no redundant pots or pans.
Step 4: Check lids, handles, and small parts
Fit each lid to its pot and inspect handles, hinges, locking parts, and grippers. Make sure handles stay secure and can be folded or removed for packing without pinching fingers. Add a heat-resistant pot gripper if the cookware does not have a safe handle.
Tip:Metal handles can become hot even when they look cool. Keep gloves or a gripper accessible during cooking, not buried in the pack.
Check: Lids fit, handles lock in their cooking position, and you have a safe way to lift hot cookware.
Step 5: Pack the cooking and cleaning tools
Pack the spoon or spatula, ignition source, fuel, and cleaning supplies needed for your setup. Keep sharp utensils sheathed and store small parts inside the pot if they cannot scratch a nonstick surface. Place fuel in a separate, secure area away from food and heat.
Tip:Bring only the utensils your menu requires. A compact spoon may cover stirring and serving, but do not use metal tools on cookware whose instructions prohibit them.
Check: You can reach the stove, fuel, ignition source, utensil, and pot gripper without unpacking unrelated gear.
Step 6: Protect the cookware while packing
Nest pots and pans only when the maker permits it. Put a soft cloth between pieces to prevent rattling and surface damage, and keep the lid secured so it cannot fall out. Pack the cookware where it will not be crushed by heavier gear.
Tip:Do not force nested pieces together. A tight fit can jam them or damage coatings and handles.
Check: The kit stays together when lifted, the lid is secure, and cookware surfaces do not rub directly against one another.
Step 7: Set up and test before the trip
At home or in a permitted outdoor test area, assemble the stove according to its manual and place an empty pot on the supports to check stability. If testing the burner, use the correct fuel and light it exactly as directed. Turn it off, let everything cool, then repack the complete kit.
Tip:Do not test a stove near dry grass, fuel containers, tents, or other flammable materials. Skip flame testing when you cannot provide a safe, permitted location.
Check: The pot sits steadily, the stove operates as directed if tested, and all parts are back in the kit.
Step 8: Cook and clean at camp
Set the stove on a stable, level surface outdoors and keep it clear of flammable materials. Cook with the flame at the lowest effective setting, stir as needed, and use the gripper or gloves to move hot cookware. After cooking, let the pot cool before washing it with the permitted amount of water and soap; pack out food scraps and wastewater as local rules require.
Tip:Wind can tip a pot or waste fuel. Use a windscreen only if the stove maker allows it; some stoves can overheat when enclosed.
Check: The meal is cooked without spills or unstable cookware, and the cooled kit is clean, dry, and ready to pack.
Common Mistakes to Avoid
- Packing a pot that does not fit the stove supports. — Check the cookware diameter and stove manual before the trip, then test the pot’s stability on the supports.
- Bringing cookware too small for the largest meal. — Estimate the largest batch and leave room for stirring; cook in batches if a suitable pot would be too bulky.
- Using cookware on a heat source it is not rated for. — Read the label or maker’s instructions, especially before exposing coated cookware or lightweight stove pots to direct fire.
- Putting away cookware while wet or dirty. — Clean it as campsite rules allow, dry it fully, and store it with the lid and small parts secured.
Troubleshooting
Problem: The pot rocks or slips on the stove.
Solution: Turn off the stove and let cookware cool. Reposition it on a level surface, check that the supports are deployed correctly, and use a compatible pot with a stable base if needed.
Problem: Food sticks or burns on the bottom.
Solution: Lower the heat, stir more often, and add the amount of liquid the recipe requires. If the cookware coating is damaged, stop using it and follow the maker’s guidance.
Problem: The lid or nested pieces rattle loose in the pack.
Solution: Add a cloth between pieces, secure the lid with the kit’s strap or a reusable band, and repack the set upright in a protected spot.
Problem: The burner struggles in wind or uses fuel quickly.
Solution: Move the stove to a sheltered, well-ventilated outdoor location and reduce unnecessary flame exposure. Use a windscreen only when the stove maker permits it; check fuel connections and follow the manual if performance remains poor.
What Success Looks Like
Your kit contains cookware matched to the stove or permitted fire method, enough capacity for the planned meals, safe handling tools, and the supplies needed to clean it. The packed set is secure and protected, and the stove and pot sit steadily when assembled. At camp, you can cook outdoors without spills, then clean, dry, and store the kit according to site rules.
Next Steps
After the trip, wash and dry each piece fully, inspect coatings and handles for damage, and replace worn grippers or missing parts. Store cookware with lids and small accessories together, but keep fuel in the storage conditions stated on its label. Adjust the kit after each trip by removing unused pieces or adding cookware required by meals that did not work with your setup.
Frequently Asked Questions
What cookware is best for a portable camping stove?
Choose cookware that the stove maker permits and that rests securely on the supports. Aluminum and titanium are common lightweight options; compare weight, heat behavior, durability, and any care limits before choosing.
Can I use my camping pot over a campfire?
Only if the cookware is rated for direct flame and the campsite allows campfires. Follow the cookware and site instructions, and use heat-resistant gloves or a gripper.
How much cookware should I bring?
Bring the fewest pieces that cover your planned meals. A solo trip may need one pot; a group or menu with frying may need a larger pot or pan. Plan portions before choosing capacity.
How should I clean camping cookware with limited water?
Follow campsite rules for washing and wastewater. Wipe out food residue first, use a small amount of permitted soap and water, and pack out scraps or wastewater when required. Dry the cookware before storage.
Can cookware be packed with fuel?
Keep fuel separate from food and cookware, secure it against leaks or damage, and follow the fuel label and transport rules. Never store fuel near a heat source.